How does ARM boot?
There are some differences between processors, but concept stays similar.
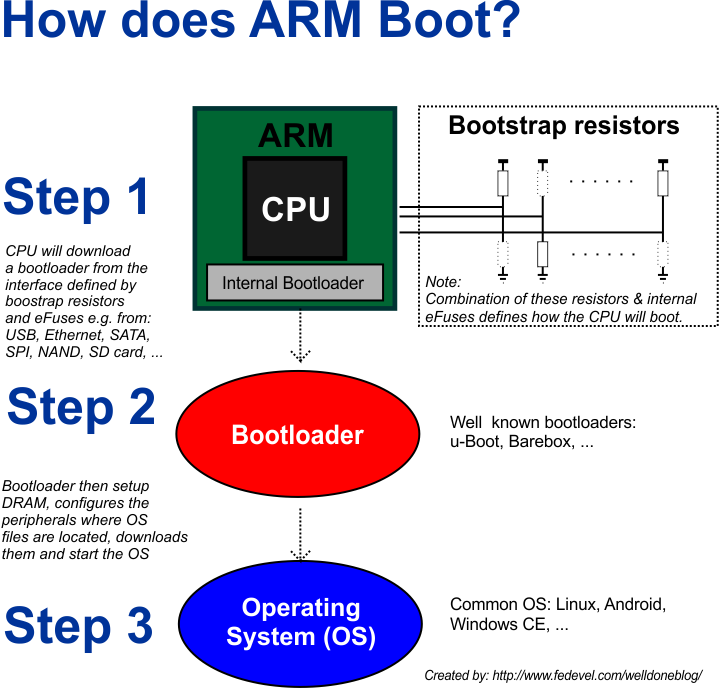
Step 1: Internal bootloader
Based on bootstrap resistors (or/and eFuses) an internal bootloader (stored in CPU ROM) determines what peripheral will be used for booting (NAND, SD card, SATA, SPI, Ethernet, ….). From this peripheral a small code (bootloader) is downloaded to internal CPU SRAM and started.Tip: Often, the same internal bootloader can be used to download an image over serial port or USB and execute it. This is very useful during the initial stage of development (e.g. it’s possible to start a board with no firmware, booted it up and FLASH a firmware to the onboard memory).
Note: eFuses are used for some CPUs (e.g. Freescale processors). An eFuse defines some advanced boot settings (e.g. “boot from the SPI memory chip connected to SPI port 3 and chipselect 2”). Be aware, once an eFuse is programmed to 1, it can not be changed back to 0.
Step 2: Bootloader
The main purpose of the Bootloader is initialize DRAM and the peripherals needed for OS booting. The OS files are then downloaded from a peripheral (NAND, SD card, SATA, SPI, Ethernet, ….) to DRAM and executed.Tip: Bootloader has some basic commands which can be used for debugging / testing (e.g. read / write memory, loading images to ram, starting images, …). Bootloader also keeps some parameters, which are later used to start OS (such: what serial port is used for OS output, memory size, file system info, video output info …..)
Step 3: OS
At this stage, the OS is loaded and started.Note: There are differences between OS. Generally, Linux has two parts called Kernel and file system (Kernel is the OS itself, File System is the part where all the files are located).
Watch the practical demonstration in this 6 minutes video